Raspberry Pi bežična kontrola uređaja
Veoma jednostavan i zanimljiv projekat koji vam omogućuje bežičnu kontrolu vaših uređaja u kući korišćenjem jeftinog seta za bežičnu kontrolu utičnica.
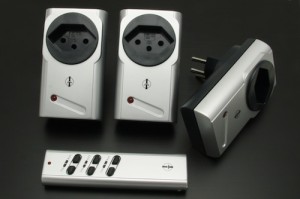
Daljiniski upravljač je potrebno preraditi i napraviti docking station kao na slikama.
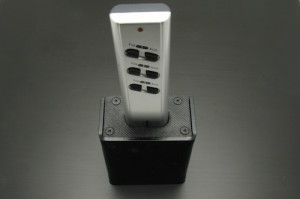
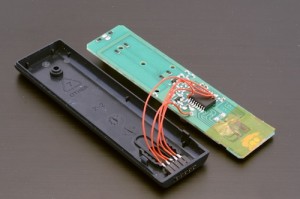
Prekidači na daljinskom upravljaču se povezuju preko releja ili optokaplera na GPIO pinove RPi-a.

$out2 = yFindRelay(„Out2“);
$state->set_output(Y_OUTPUT_ON); // select the „On“ contact
$out2->pulse(500); // Connecting with output 2
Izrada web interfejsa za kontrolu putem telefona
To make your work easier, we have prepared a small PHP example including a PHP control page and a web command interface (based on jQuery and compatible with mobile phones).
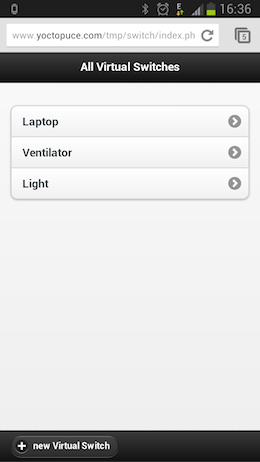
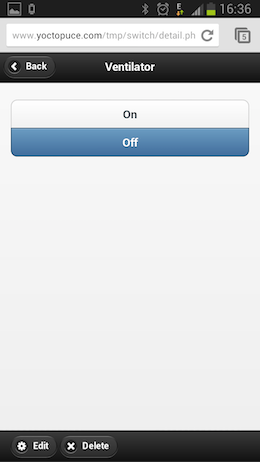
This web application allows you to define virtual switches which are going to activate one or more real relays. As it’s the VirtualHub which decides when it contacts our PHP script, the web application must save in a file (or in a database) the actions to be performed next time our callback script is called.
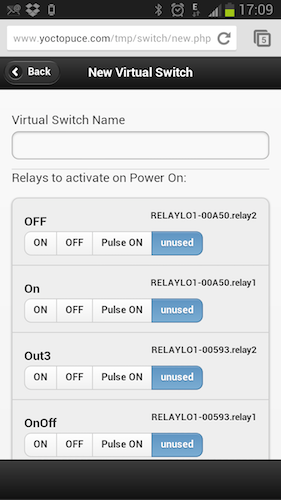
Logical switch configuration page
The only page using the API is the callback.php page which, on top of initializing the API in callback mode, has two tasks to perform:
First, we save in a file the list of connected relays. The aim is to have a list of the connected relays so that when configuring we don’t have to remember the serial number of the relay which is connected.
Second, we apply the necessary actions on the relays. To do this, we load the files containing the actions to be run and we call the relay pulse or set_output methods.
include(‘yocto_relay.php’);// Uses explicit error handling rather than exceptions
yDisableExceptions();// Sets up the API to use the VirtualHub on local machine
$errmsg = „“;
if(yRegisterHub(‘callback’,$errmsg) != YAPI_SUCCESS) {
logtofile(„Unable to start the API in callback mode ($errmsg)“);
die();
}…
…
// create an array of all connected Relay ( we do not use it
// no but if will be usefull when the user will configure his
// VirtualSwitch)
$detected_relay= LoadDetectedRelays();
$yrelay = yFirstRelay();
while($yrelay!=null){
$detected_relay[$yrelay->get_hardwareId()] = new Relay($yrelay);
$yrelay = $yrelay->nextRelay();
}
SaveDetectedRelays($detected_relay);// loads all VirtualSwitch that need to be updated
$all_vswitches = LoadVirtualSwitchesToUpdate();
foreach($all_vswitches as $name => $virtual_switch) {
// retrieves the list of all physical relay of current
// Virtual Switch to update
if($virtual_switch->isOnNow()){
$relay_to_update =$virtual_switch->getRelaysForState(‘on’);
} else {
$relay_to_update =$virtual_switch->getRelaysForState(‘off’);
}
foreach ($relay_to_update as $hwid => $action) {
//applies to the Yocto-Relay the corresponding action
$yrelay = yFindRelay($hwid);
if(!$yrelay->isOnline()){
logtofile(„$hwid is not online“);
}
switch($action){
case ‘stateOn’:
$yrelay->set_output(Y_OUTPUT_ON);
break;
case ‘stateOff’:
$yrelay->set_output(Y_OUTPUT_OFF);
break;
case ‘pulse’:
$yrelay->pulse(500);
break;
default:
logtofile(„Unspported action:“.$action);
}
}
}
The complete source code is available in the Examples/Prog-HTTPCallback/ directory of the latest PHP library. For a more universal and professional solution, you should add the possibility to program different day/night cycles and a randomization function to simulate a presence. We have tried to keep the code as simple as possible to illustrate this new working mode.
